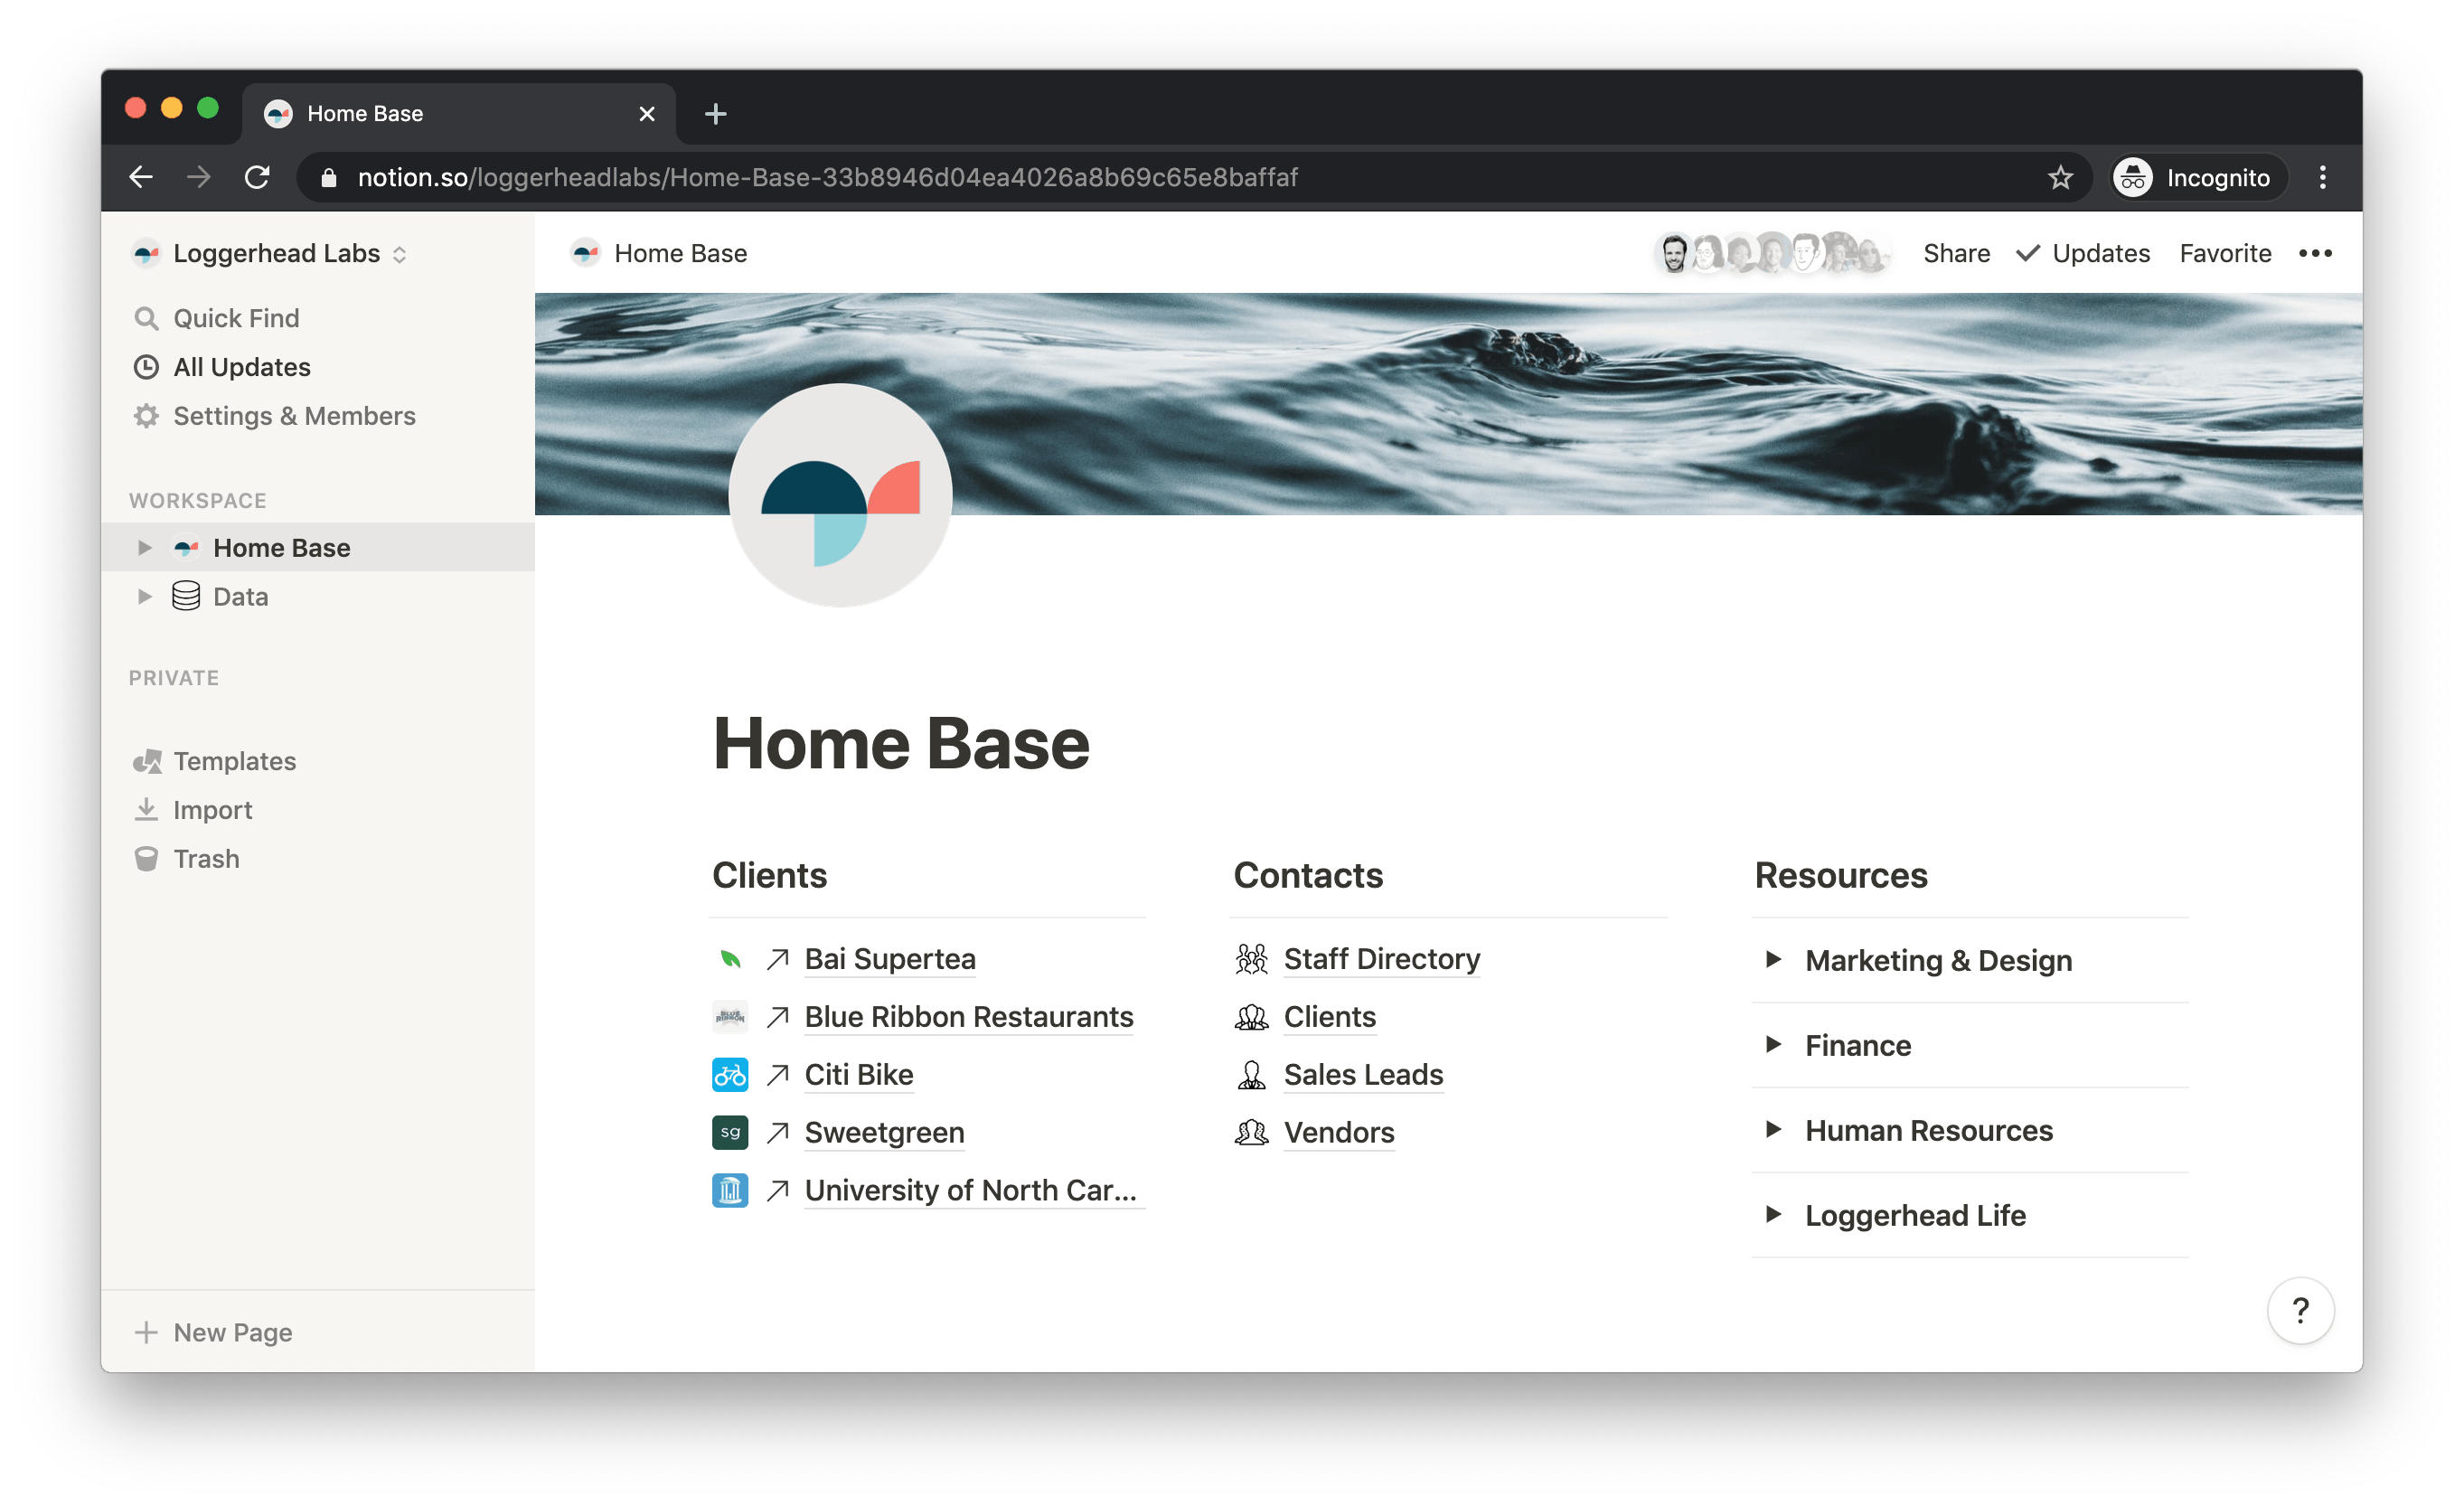
A bulletproof Notion workspace is structured enough to keep information clean and manageable. Meanwhile, it’s flexible enough to accommodate new users, fresh content and updates to Notion itself. Like an effective website, finding information is easy, navigation is intuitive, and the overall experience is filled with delight.
With this two-pronged approach, you’ll establish a workspace that’s useful, sustainable and joyful for users of every stripe:
- Centralize your information in master databases.
- Create gateways for accessing that information.
Each prong has a dedicated top-level page: Data for your information, and Home Base for accessing it.
The nuances might be a lot to digest, but if you practice the concepts in a new workspace, guided by the text below and sample workspace, you’ll get it. And if you hit a roadblock, tweet @WilliamNutt, respond to the newsletter or post a YouTube comment.
When it clicks, you’ll have an elevated understanding of Notion and the most powerful method of organizing your workspaces.
Start with the video, or jump into the step-by-step text.
How you’ll do it.
- First, choose an icon format.
- Centralize your information in master databases.
- Use PARA as a guide.
- Create your Data page.
- Create your master databases.
- Create your Areas database.
- Create your Projects database.
- Create your Tasks database.
- Create your Resources database.
- Link your master databases.
- Link your Areas and Projects databases.
- Link your Projects and Tasks databases.
- Link your Areas and Resources databases.
- Create Project and Area templates.
- The three Resource types.
- If you like, disregard Archives.
- Create gateways to your information.
First, choose an icon format.

Adding icons to Notion pages enhances the overall workspace aesthetic. In addition to the top of pages, icons appear to the left of page links. That includes linked pages within other pages, sidebar links, and database entries.
Traditional emojis are fun, but committing to a consistent format offers a more polished and professional aesthetic. Minimal, monochromatic icons are especially elegant, and many collections are available for free. Icons8 and Flaticon are especially popular, and our own Notion Icons tool makes them remarkably easy to use.
Choose an icon format to implement consistently as you construct your bulletproof workspace.
Centralize your information in master databases.
Before considering how users will interact with your information, consolidate it in a central location. Notion allows us to establish master databases, then use views to display their data through specified perspectives. Focus first on making a home for your information within a few master databases.
Use PARA as a guide.
The PARA Method provides a helpful framework for your master databases.
PARA — from a bird’s eye.
Developed by productivity expert Tiago Forte, PARA is the outcome of extensive research on cognitive processes. You can dive deeper with Tiago’s post, but generally, PARA segments your information into four buckets. The descriptions below frame them in the context of Notion workspaces.
Projects
Initiatives (possibly recurring) with defined outcomes and a deadline, completed through a series of tasks. Examples: organizing an event, creating a website and conducting an advertising campaignResources
Materials for general reference or use for your Projects. Examples: a multimedia library, educational material and a contact listAreas
The high-level categories of your work or life. All Projects and most Resources fall within an Area. Examples: accounting, continuing education and marketingArchives
Completed or inactive Projects, Resources and Areas.
PARA ♥ Notion.
PARA and Notion are a match made in heaven. Notion’s hierarchical structure and relational databases beautifully facilitate PARA implementation. Meanwhile, PARA provides direction for using Notion’s powerful features. It leaves no question of where information should be stored.
A bulletproof workspace contains master databases for Areas, Projects and Resources, as well as the Tasks that comprise Projects. Then, it uses views to surface that information through refined perspectives.
Create your Data page.
Your Data page contains your master databases. Add it among the pages shared across your workspace. If you’re using the Notion Icons collection, consider Database.
Create your master databases.
Create your Areas database.
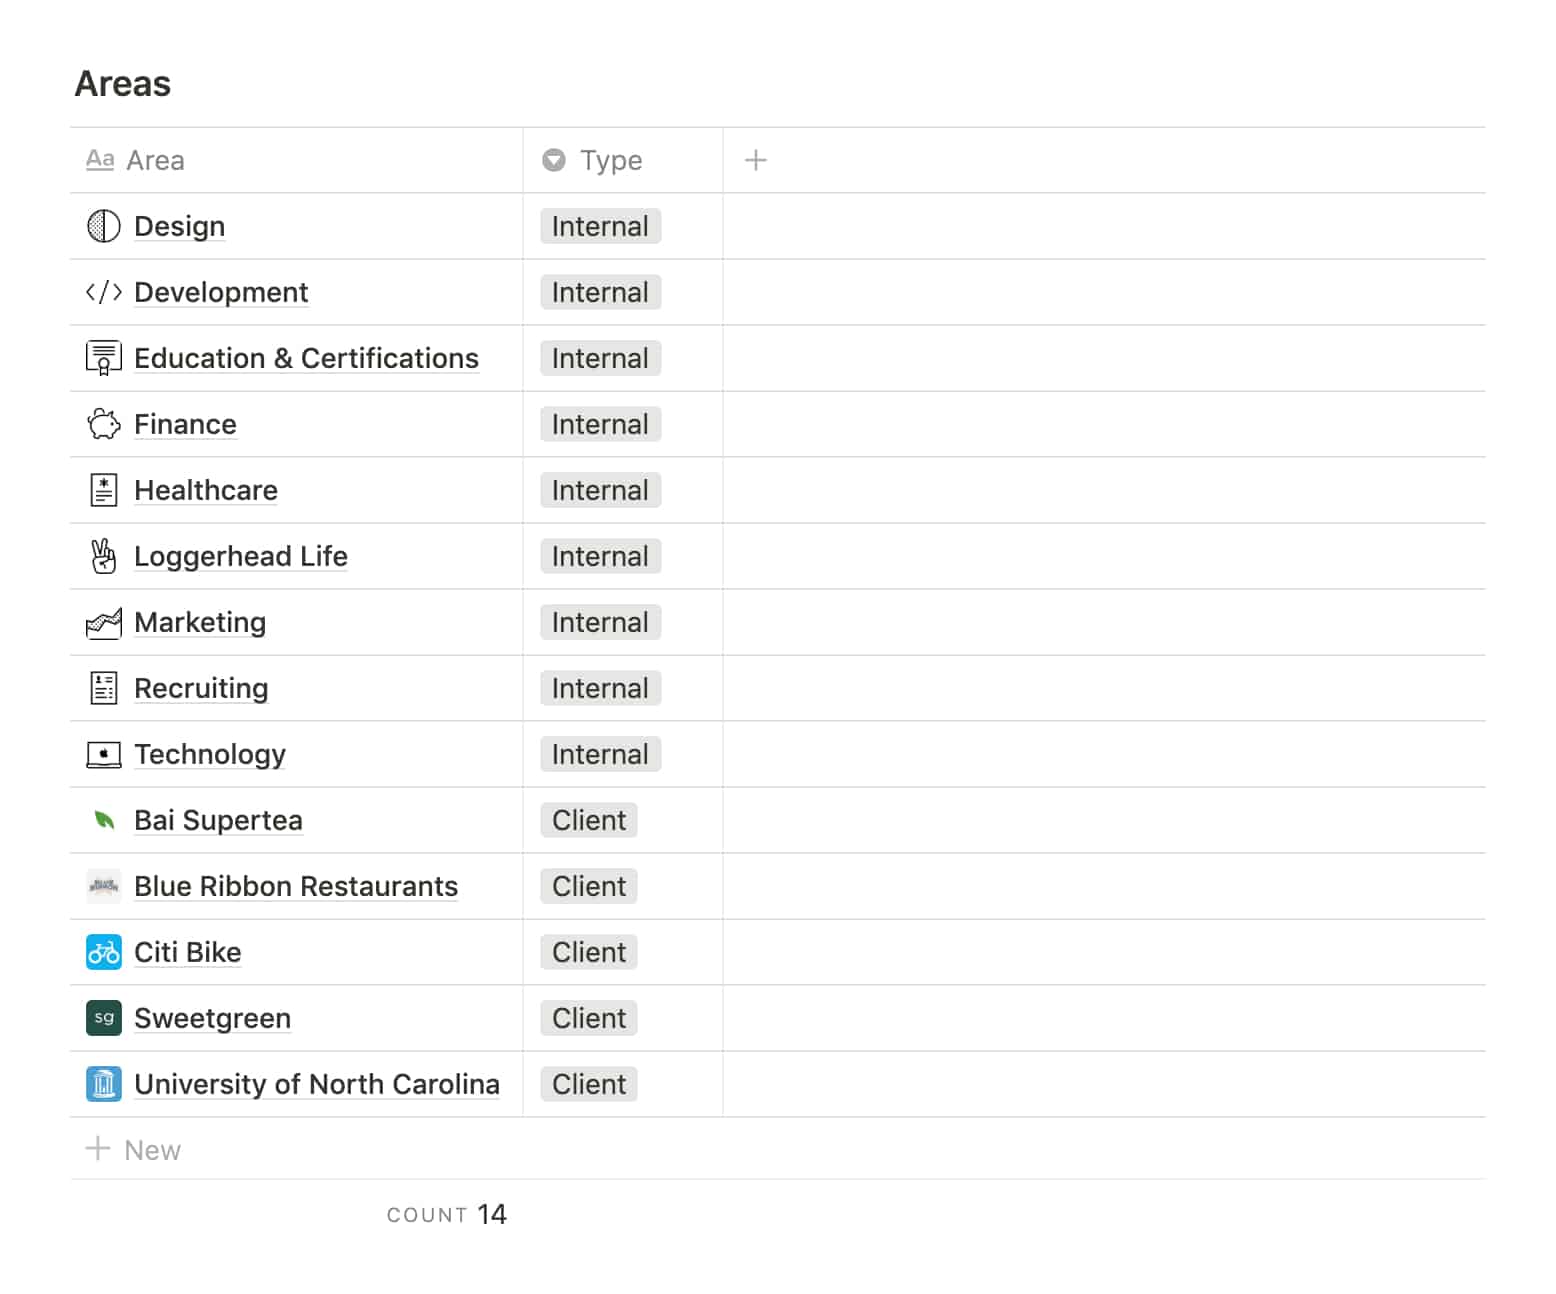
Quick reminder: Areas are high-level categories of your life and work, such as finances, marketing and continuing education. All Projects and most Resources fall within an Area. At work, your organization’s internal departments will likely be Areas, and in some instances, so will your clients.
- Within your Data page, add a
Table - Inline. Name it “Areas” or choose a synonymous term that suits your organization. - Rename the
Titleproperty to align with your database name. - Populate a few Areas. If you’d like, go ahead and give them icons. For clients, you might use the icon from their websites.
- Consider adding a Type (
Select) property to classify your Areas.
Loggerhead Labs has one with two options: Internal and Client. - Then, you might sort by Type.
- Delete any unused properties.
Create your Projects database.
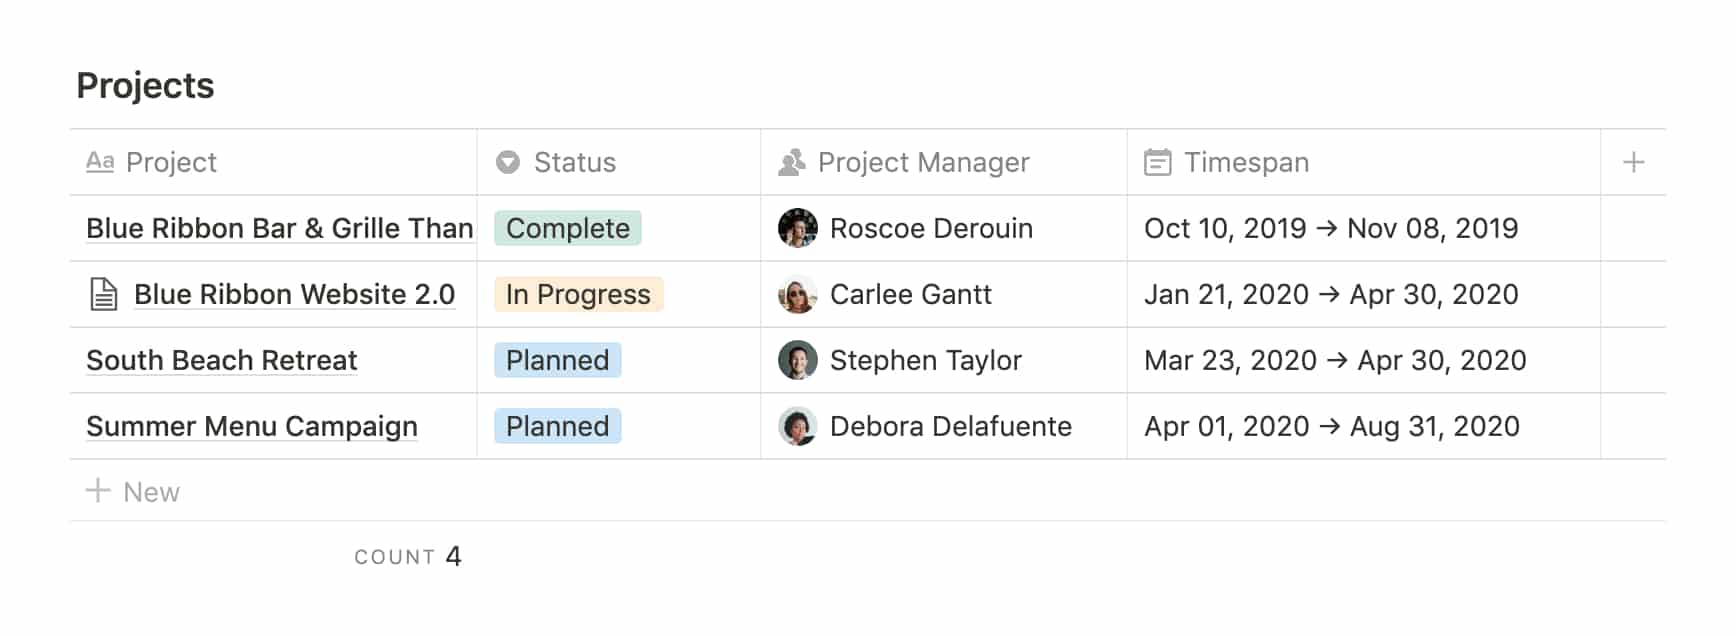
Quick reminder: A Project is an initiative (possibly recurring) with defined outcomes and a deadline, completed through a series of tasks.
- Below your Areas database, add another
Table - Inline. Name it “Projects” or choose a synonymous term that suits your organization. - Rename the
Titleproperty to align with your database name. - Add a Timespan (
Date) property and others relevant to your work.
Loggerhead Labs includes Status (Select), Project Manager (Person) and Days Remaining (Formula) properties for its Projects. - Add at least one Project that falls within an existing Area.
- Consider sorting by Timespan.
Create your Tasks database.
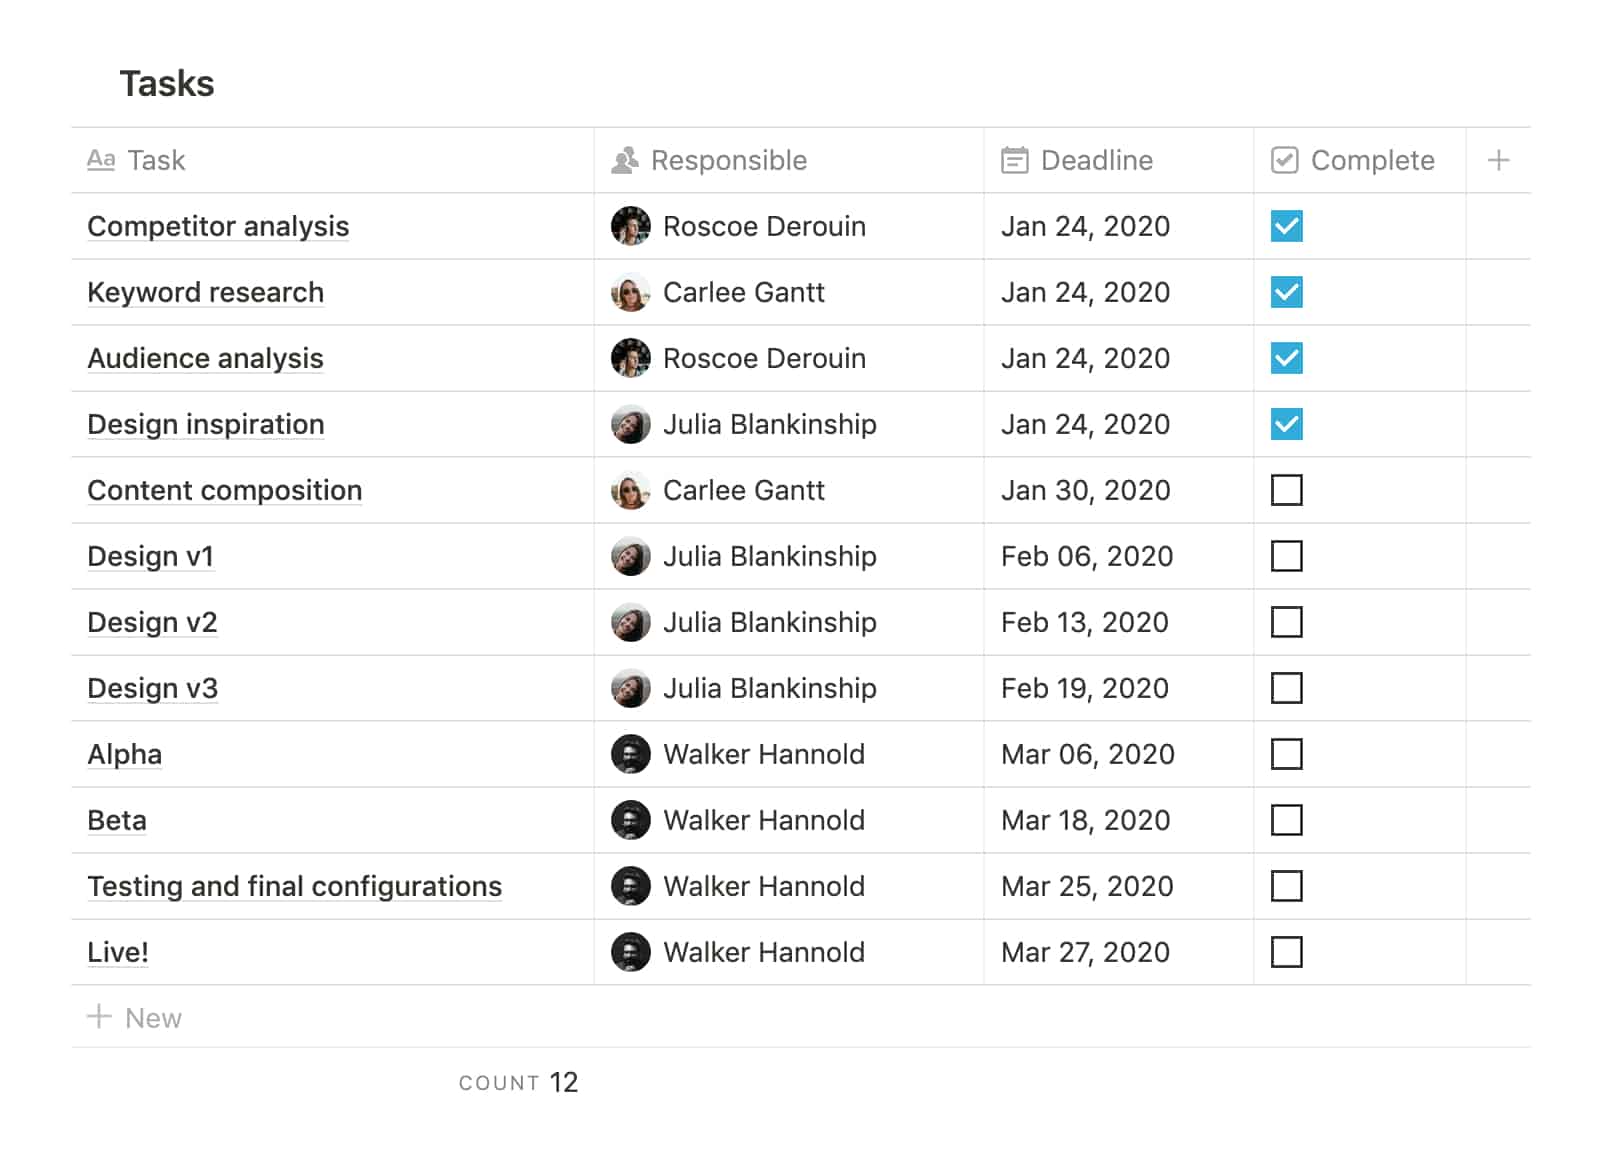
Quick reminder: Tasks make up the series of actions required to complete a Project.
- Below your Projects database, add another
Table - Inline. Name it “Tasks” or choose a synonymous term that suits your organization. - Rename the
Titleproperty to align with your database name. - Add Complete (
Checkbox), Responsible (Person) and Deadline (Date) properties. - Populate the table with a handful of Tasks that fall within an existing Project.
- Consider sorting by Deadline.
Create your Resources database.
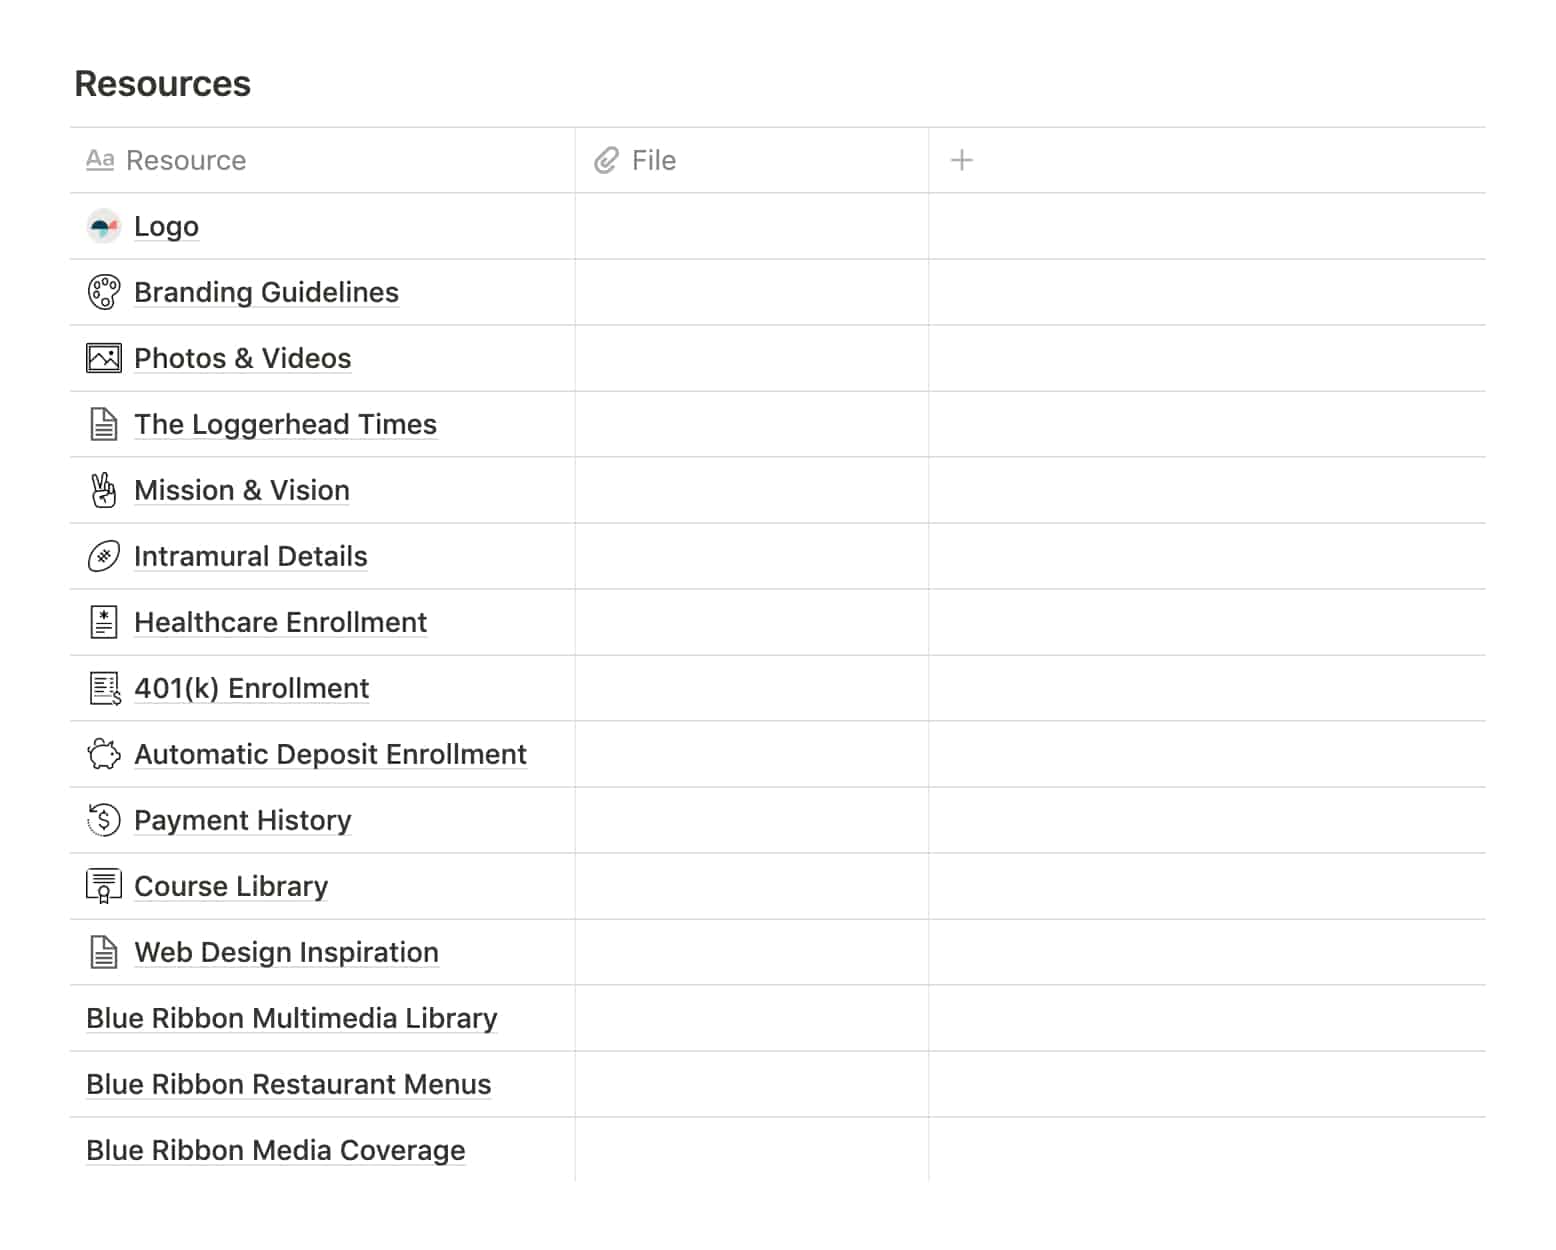
Quick reminder: Resources are materials for general reference or use within your Projects, such as photos and videos, HR documents, brand assets and educational materials.
- Below your Tasks database, add another
Table - Inline. Name it “Resources.” - Rename the
Titleproperty to “Resource.” - Ensure you have a File (
Files & Media) property, and delete any others.
Link your master databases.
A bulletproof workspace leverages Notion’s form of relational databases, where you can connect databases to inform filters, Rollup properties and other powerful features.
Link your Areas and Projects databases.
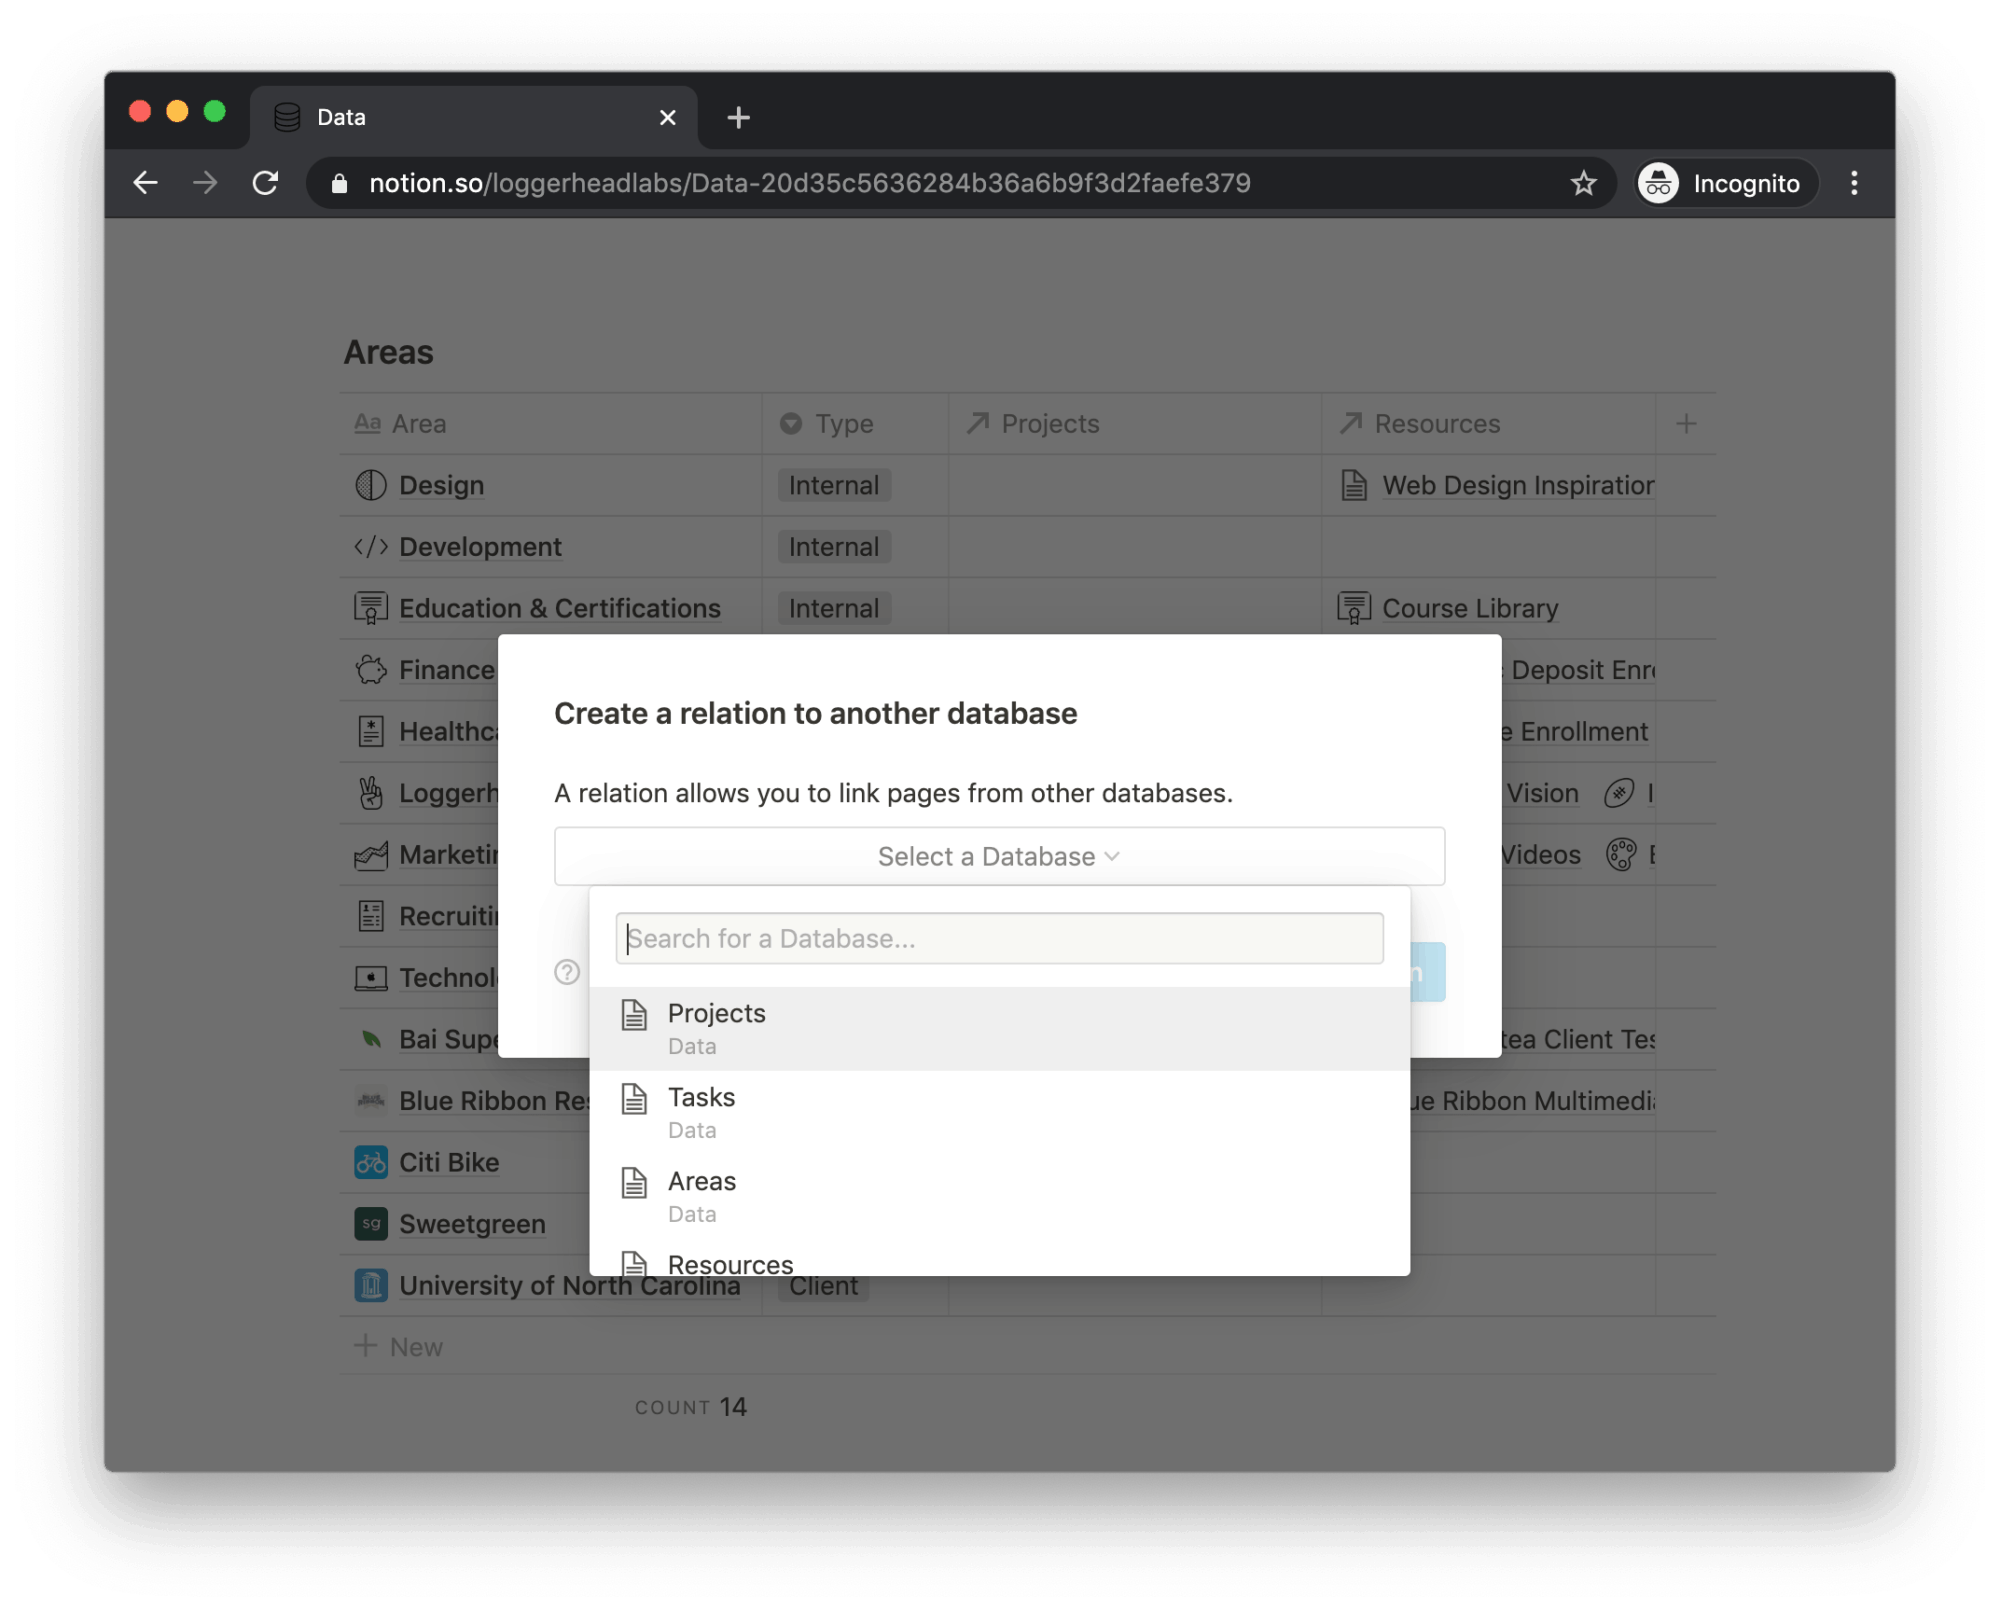
- Add a
Relationproperty to your Areas database; choose your Projects database. - In the Areas and Projects databases, rename the new
Relationproperties to “Projects” and “Area,” respectively, or whichever terms align with your database names. - For Projects you’ve already added, populate the new Area property with the corresponding Area.
Link your Projects and Tasks databases.
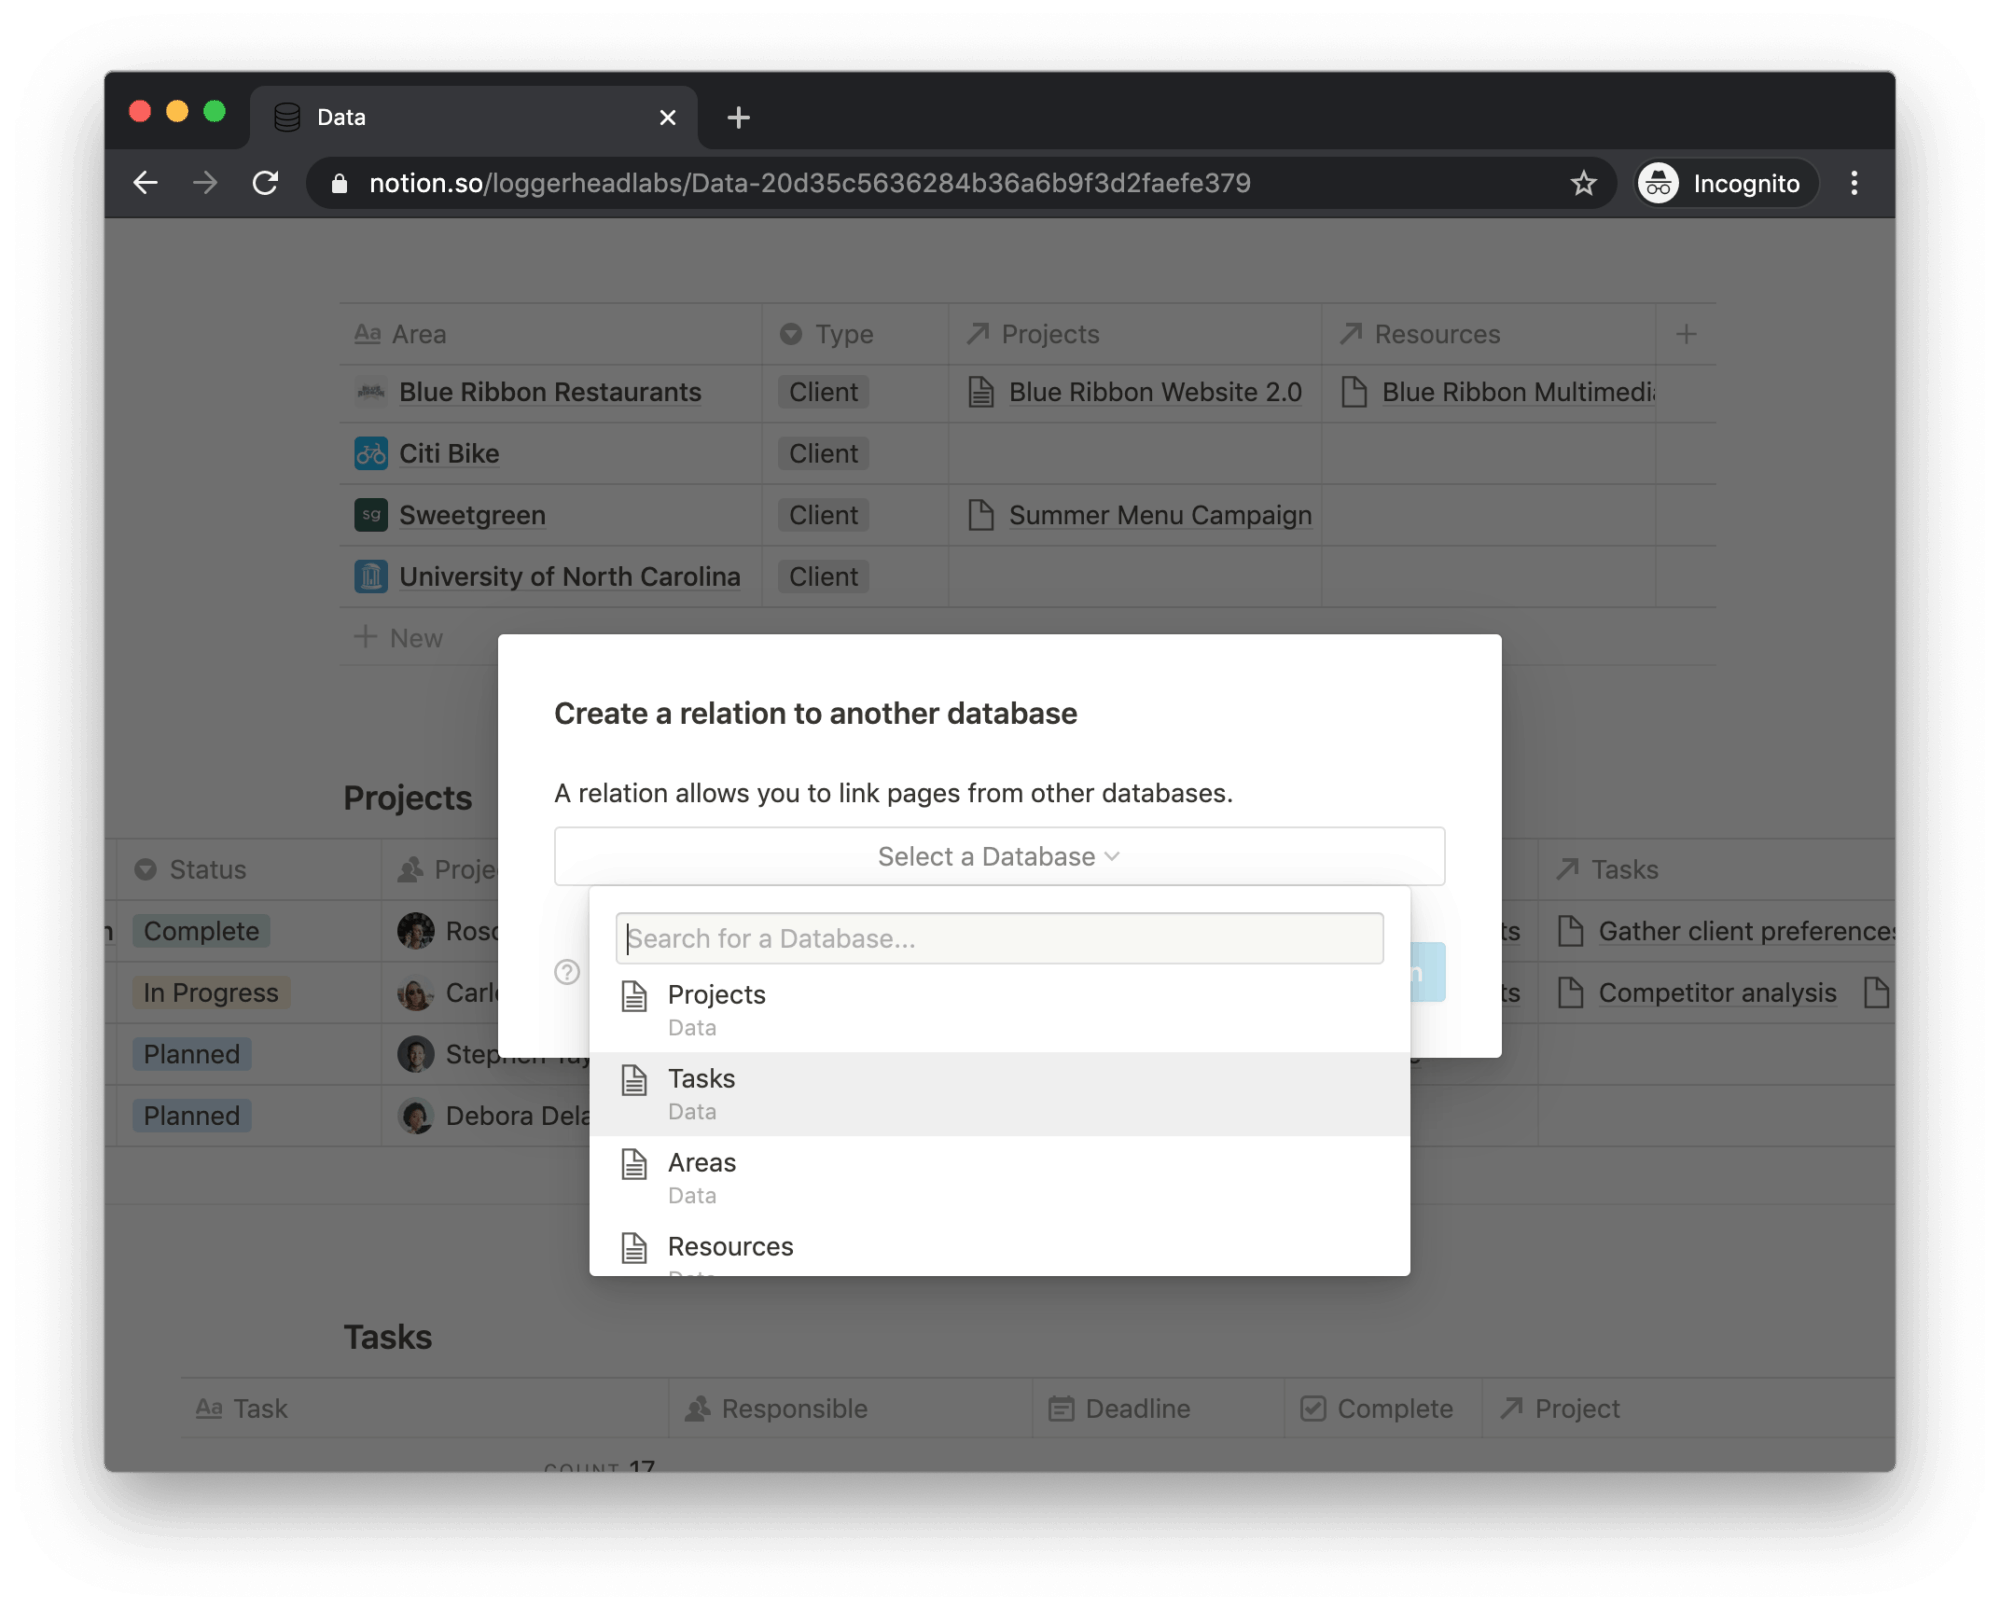
- Add another
Relationproperty to your Projects database; choose your Tasks database. - In the Projects and Tasks databases, rename the new properties “Tasks” and “Project,” respectively, or whichever terms align with your database names.
- For existing Tasks, add the corresponding Project within the new Project property.
- Then, if you’re comfortable, you can add a calculated Progress (
Lookup) property to the Projects database to indicate the percentage of tasks completed. (Questions? Fire away on Twitter or in the YouTube comments.) - In your Tasks database, consider adding Project as you first sort property, keeping Deadline as your secondary property.
Link your Areas and Resources databases.
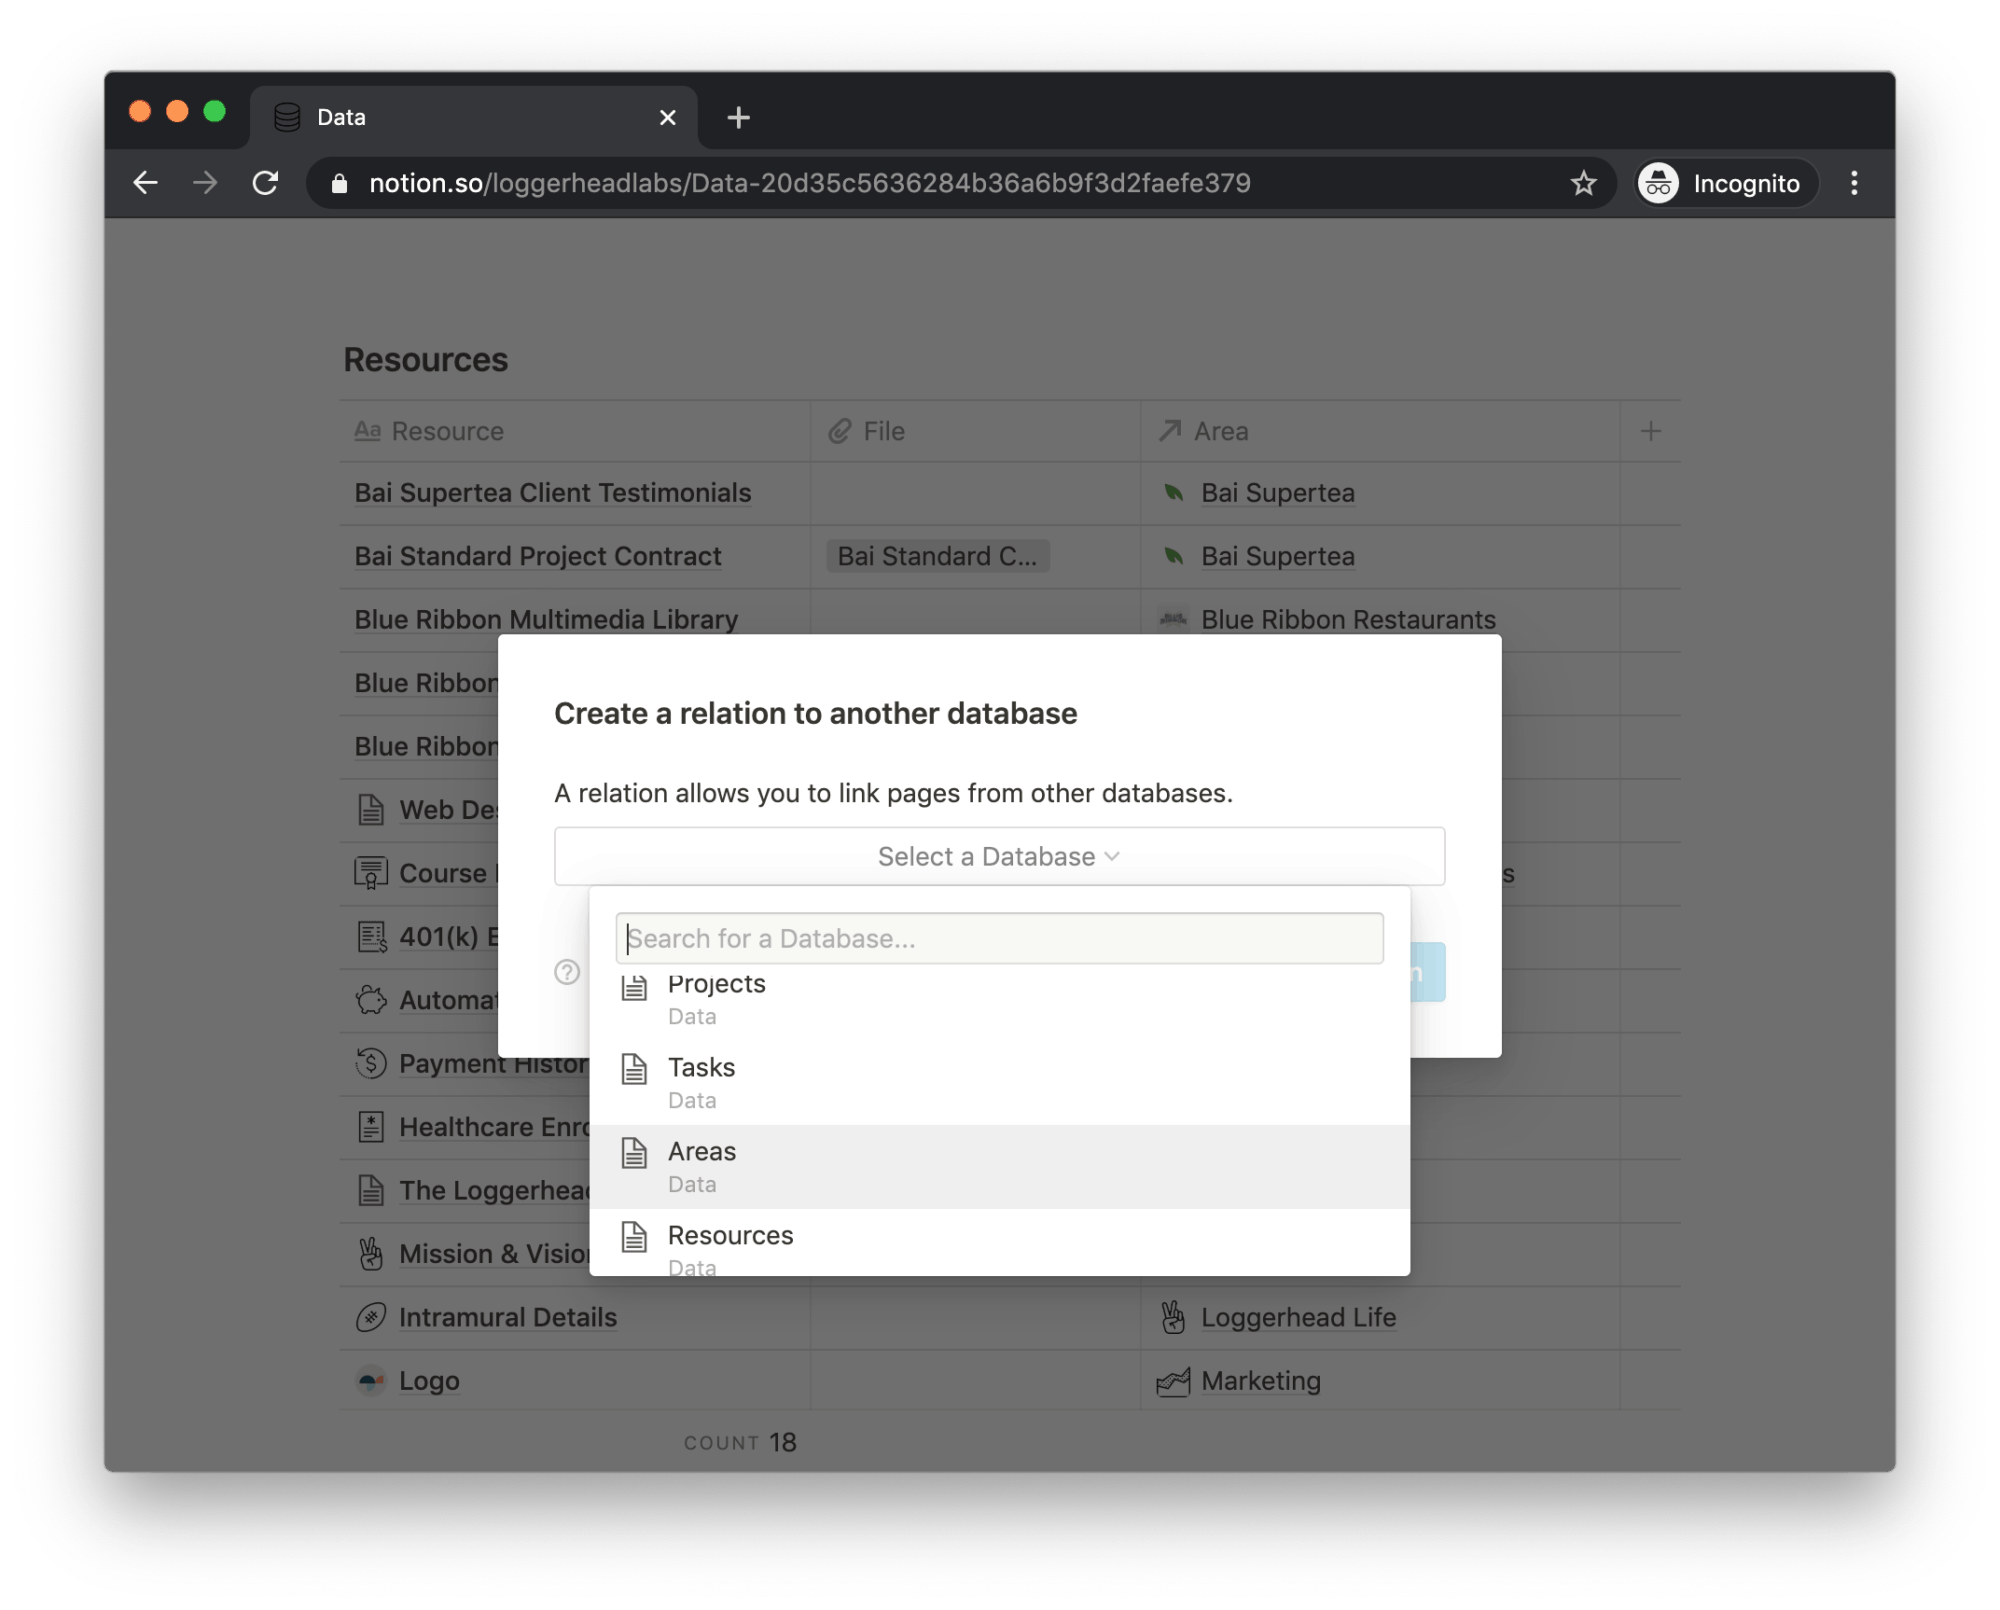
- Add
Relationproperty to your Resources database; choose your Areas database. - In the Areas and Resources databases, rename the new properties to “Resources” and “Area(s),” respectively, or whichever terms align with your database names.
- For any existing Resources, add the corresponding Area(s) within the new Area(s) property. Remember, some Resources will contain no Area.
Create Project and Area templates.
Create a Project template.
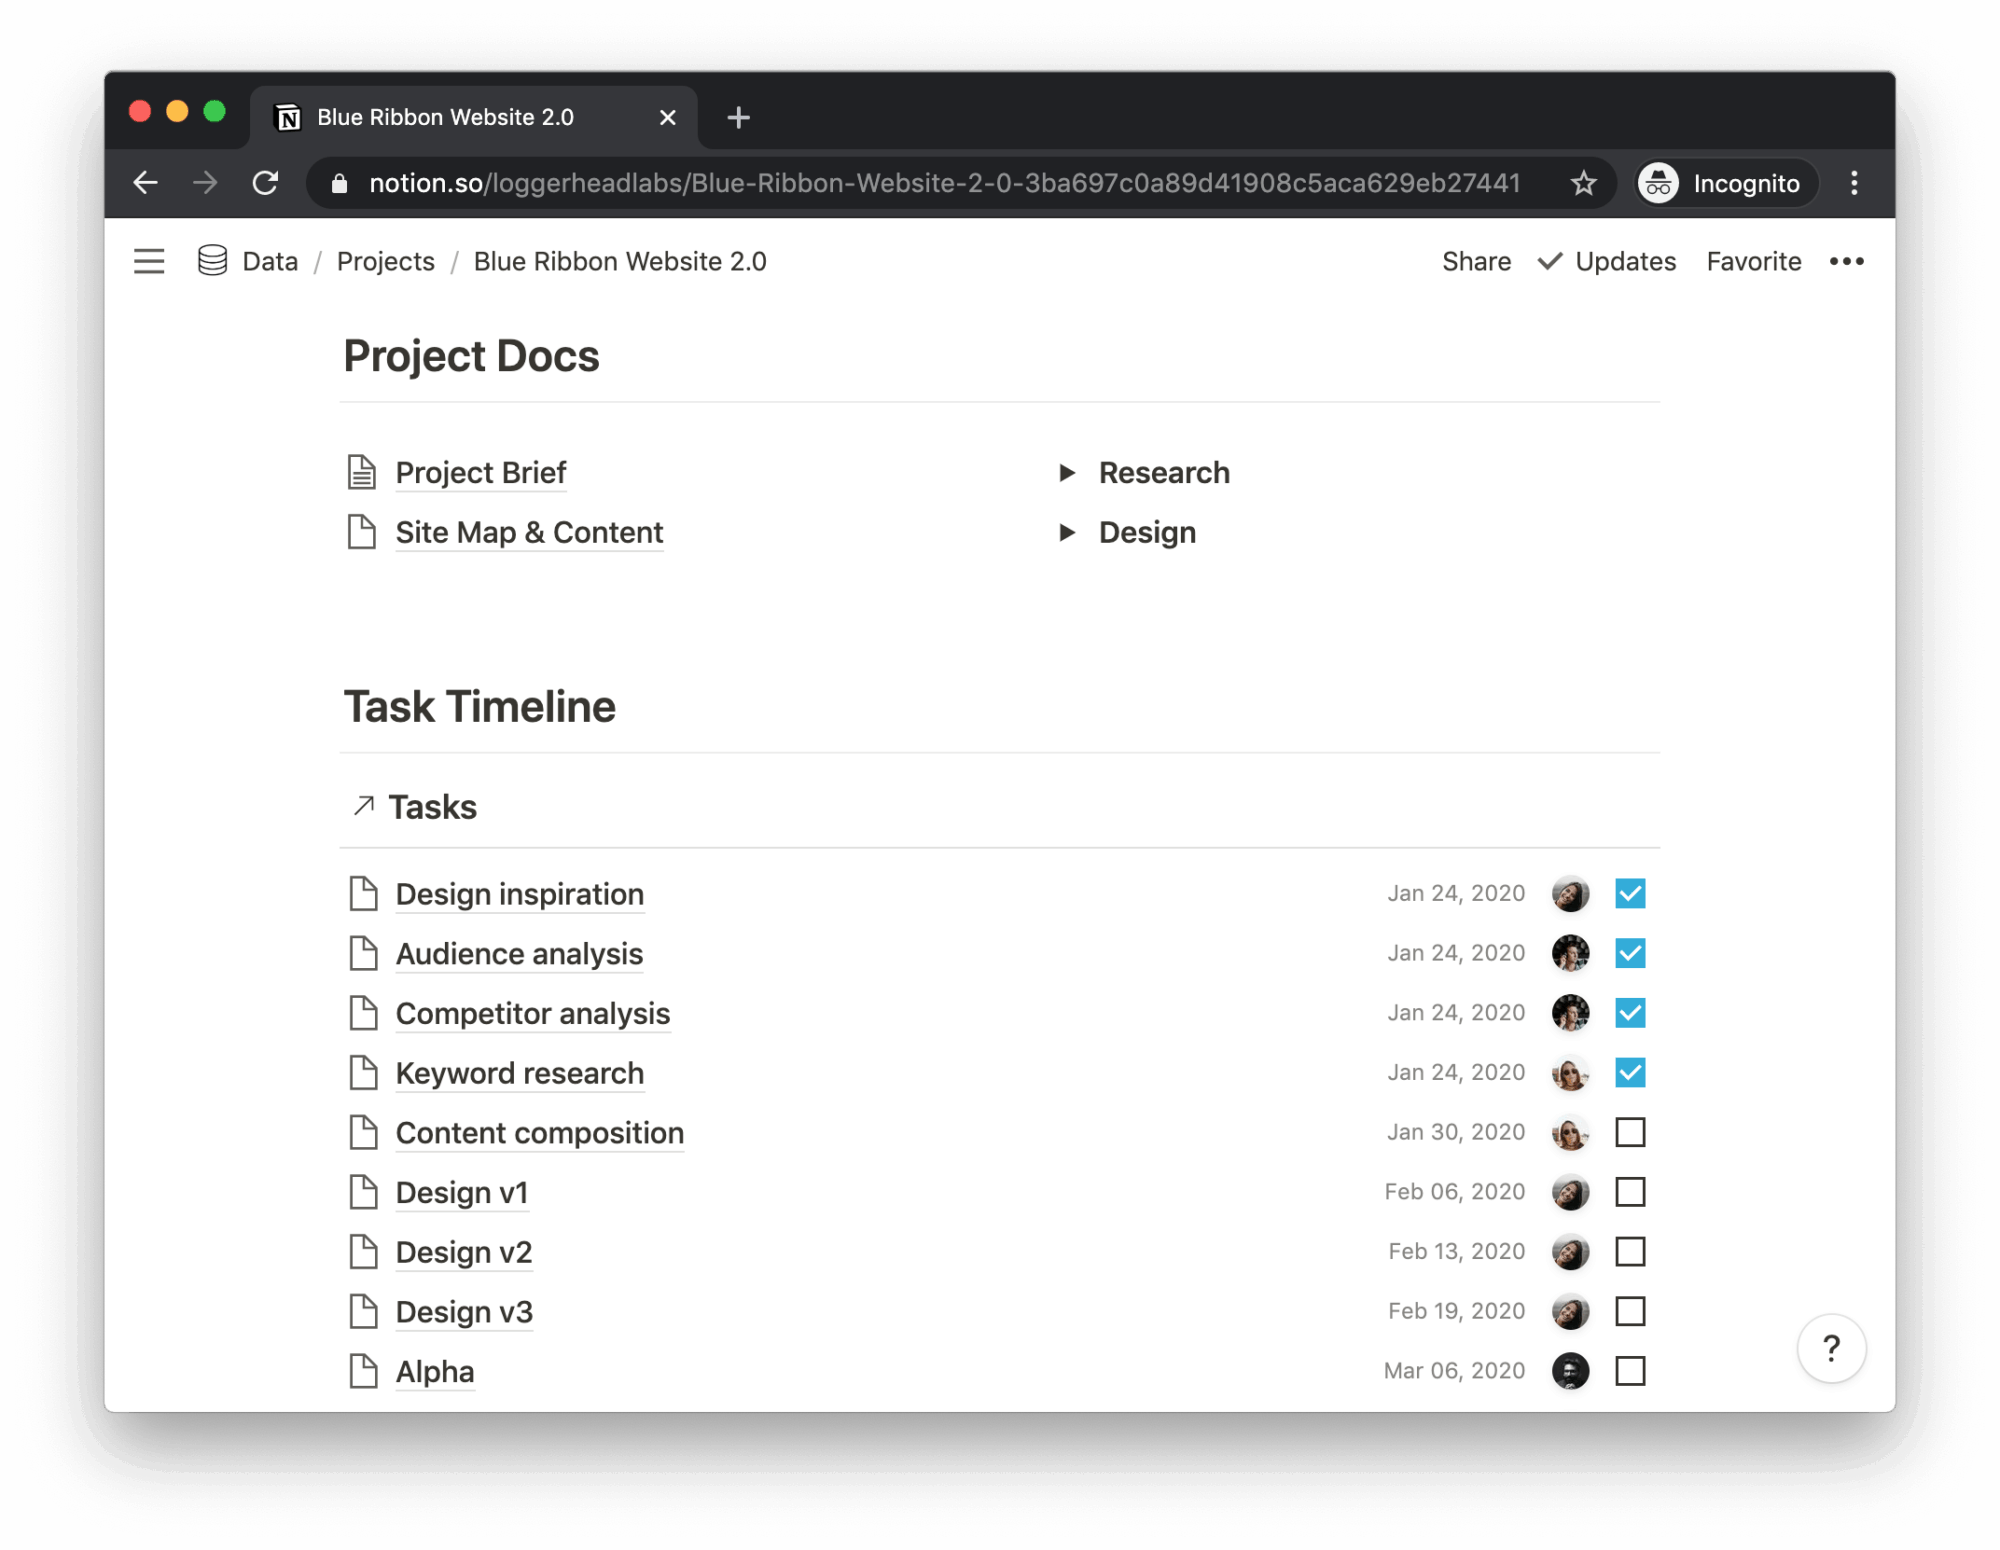
The inner page content of a Project contains all information associated with the project. That includes documents, such as the Project Brief, preliminary research and supporting materials, as well as the Tasks linked to the Project. With Notion’s templates and unique database views, it’s easy to configure and replicate the inner page contents for Projects.
Populate your first Project page.
- Open (as a page) a Project that’s connected to an Area and Tasks via its
Relationproperties. - Add a heading for your Project’s documents.
Loggerhead Labs uses “Project Docs.” - Below the heading, create placeholder pages for commonly used documents, such as Project Brief and Competitor Analysis.
- Below your documents, add a header for your Tasks list — “Task Timeline” works well — then insert a
Linked Databaseand select your Tasks database. - Create a new view with the List format. You might name it “Task List.”
- Delete the default view.
- Filter your list to include only the Tasks for the Project you’re editing.
- Show, hide and rearrange properties as you wish.
- Consider sorting by Deadline.
Make it a template.
- Copy the content of the Project page you just populated, then paste it within a new template for your Projects database. (Not sure where to create a template? We’re a Tweet away.)
- Tweak the formatting and database settings to match your original.
- Give the template a name.
Loggerhead Labs uses “Loggerhead Labs Project.”
Now, you can quickly populate new Project pages by selecting your template. (Make sure to adjust the database filter for each project.)
Create an Area template.
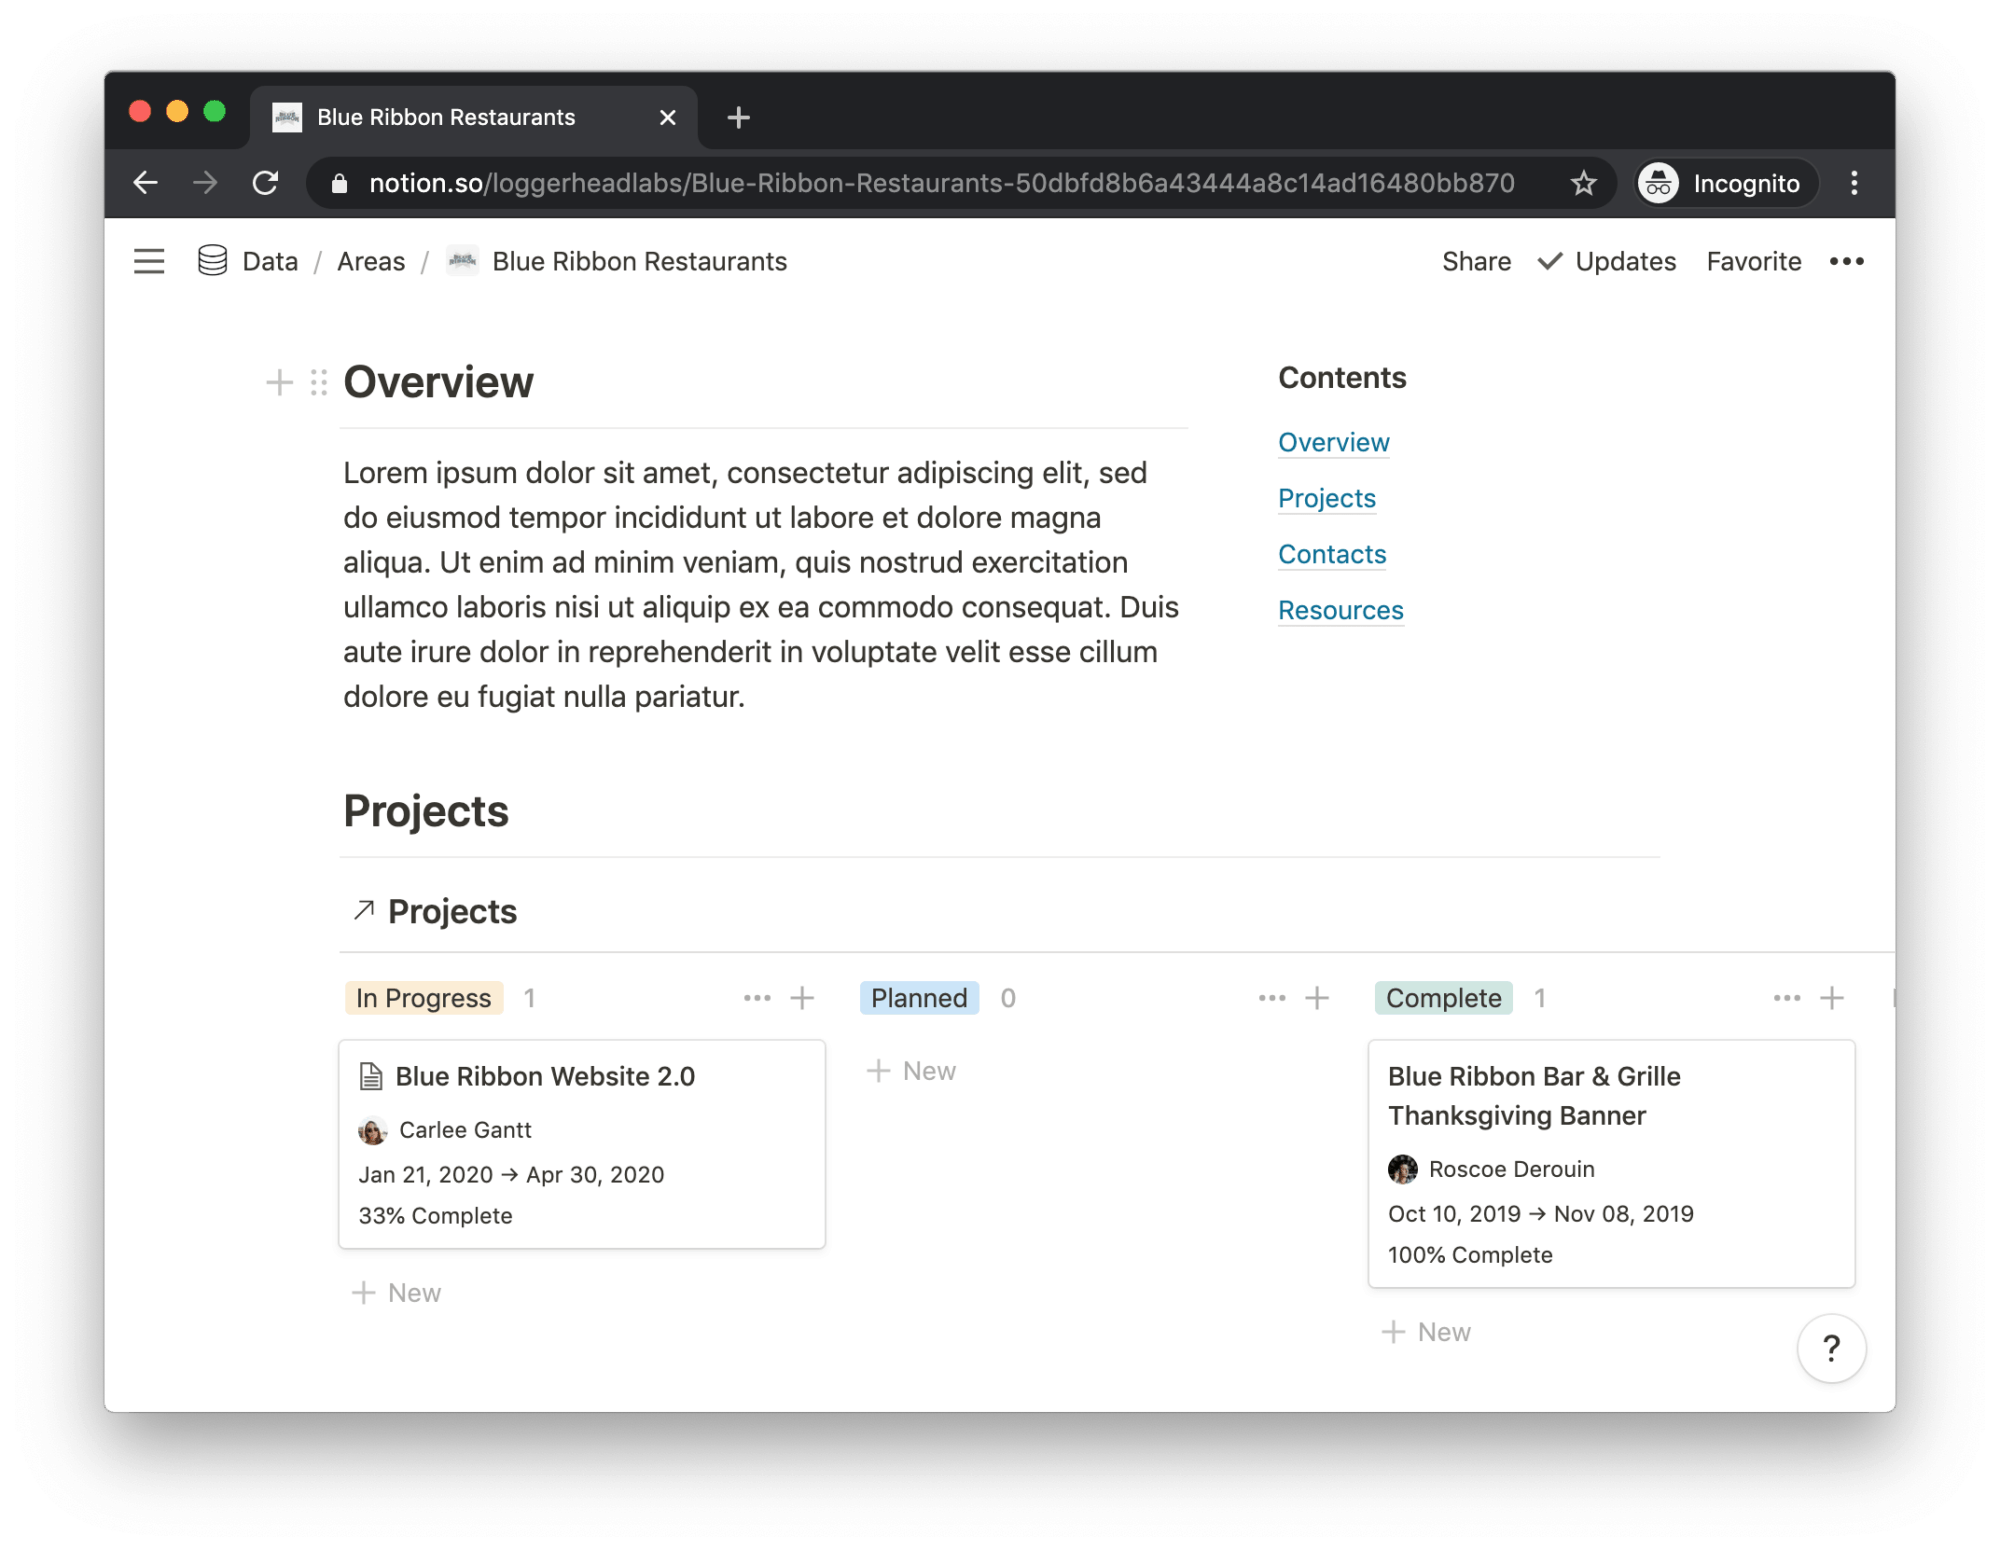
Similar to Projects, opening your Area pages can display filtered views of the linked Projects and Resources. The Loggerhead Labs example also includes a filtered view of a master contact list, which lives in the Resources database.
Populate your first Area.
- Open (as a page) an Area that’s linked to at least one Project and one Resource via its
Relationproperties. - Consider adding an introduction and
Table of Contents. (Lorem ipsum suffices at this stage.)
Add a Project board.
- Add a header for your Projects, then insert a
Linked Database. Choose your Projects database. - Loggerhead Labs displays its Projects in a Kanban board, grouped by Status. To do so, create a new view with the Board format. Name it whatever you like.
- Delete the default view.
- Filter the board to include only the Projects for the Area you’re editing.
- Group the cards by Status.
- Show and hide properties as per your preference.
We’ve used a formula to create a property that displays the word “Progress” in front of the completion percentage. Tweet or reply for details.
Add a Resource list.
- Below your Project board, add a header for your Resources, then insert a
Linked Databaseand select your Resources database. - Create a new view with the List format. Name it whatever you like.
- Delete the default view.
- Filter the list to include only the Resources for the Area you’re editing.
- Show, hide and rearrange properties however you wish.
Make it a template.
- Copy the content of the Area page you just populated. Paste it within a new template for your Areas database.
- Tweak the formatting and database preferences to match your original.
Now, you can quickly populate new Area pages by selecting your template. (Make sure to adjust the filters as necessary.)
The three Resource types.
Within your Resources database, each Resource can be one of a few formats:
- Page(s) Compose the resource directly within the page of the Resources database entry, perhaps with sub-pages.
- Database Create a database within the Resource entry.
- File Attach a file via the
Files & Mediaproperty.
If you like, disregard Archives.
Notion’s filters allow us to hide completed Projects and Tasks, as well as inactive Areas and Resources. We choose to archive our information this way rather than establishing an independent Archive database.
Create gateways to your information.
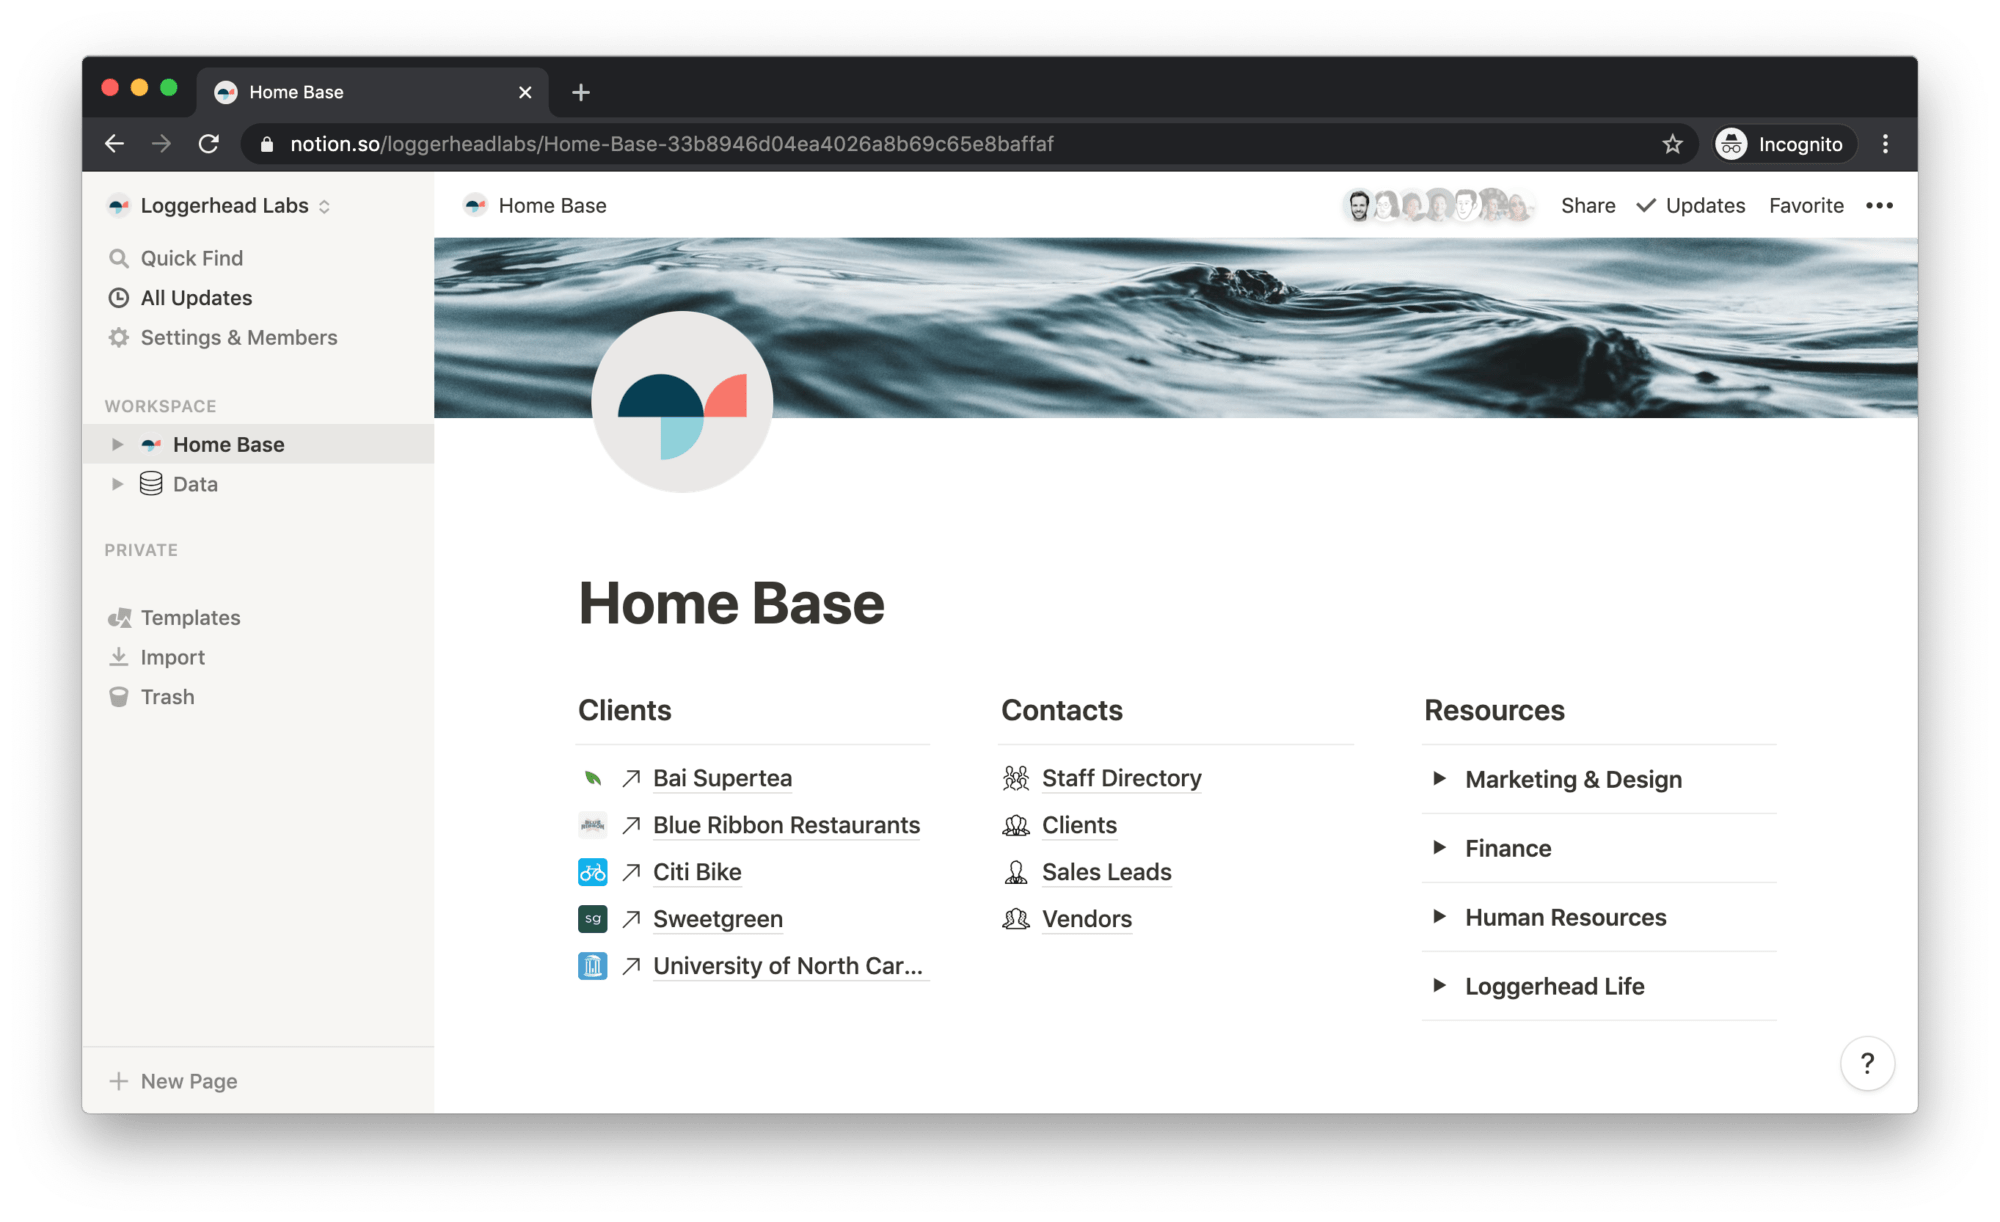
With your information centralized in master databases, you’re ready to establish an intuitive and delightful way to access it. You want the information to be easy to find and always refined for the proper context.
Notion’s hierarchical pages and customizable views makes that easy. It starts with your next top-level page — your Home Base.
Create the page for your Home Base.
Create a new page that’s shared workspace-wide. We like “Home Base,” but you can use whatever name you prefer. “Mission Control” works well, too.
Outline your Home Base.
Consider the information you and your teammates will commonly need to access. Generally, that will be specific Areas and Resources. Meanwhile, Projects are generally accessed within Areas, and Tasks within those projects. Your team can also access Projects and Tasks from their personal homepages, which we’ll cover in upcoming posts and videos.
For the moment, simply record those items in a bullet list, ignoring how they’ll exist within your master databases. Once recorded, arrange them in helpful categories and sub-categories. As a guide, reference the Loggerhead Labs Home Base. Here’s an early version of our list:
- Clients → Active clients
- Contacts → Staff, clients, vendors and sales leads
- Resources
- Marketing → Branding guidelines, logo, multlimedia assets
- Finance → Automated deposit and 401(k) enrollment, payment history
- Human Resources → Course library, healthcare enrollment
- Loggerhead Life → Vision and mission, intramural details
Prepare the content for your Home Base.
Back in your Data page, be sure all content you’ve outlined for your Home Base exists as an Area, Project or Resource.
Create your gateways.
Returning to your Home Base, convert your outline to a captivating, interactive page.
Start by creating headings for your groupings and arranging them into columns. Consider bold Toggles for sub-headings.
Beneath your headings, link to your outlined information. Each link may be one of two types:
Link to Page Block
Link directly to an Area or Resource.New Page
A new page containing aLinked Databasewith a unique view or other linked resources.
Optionally add a newsletter gallery.
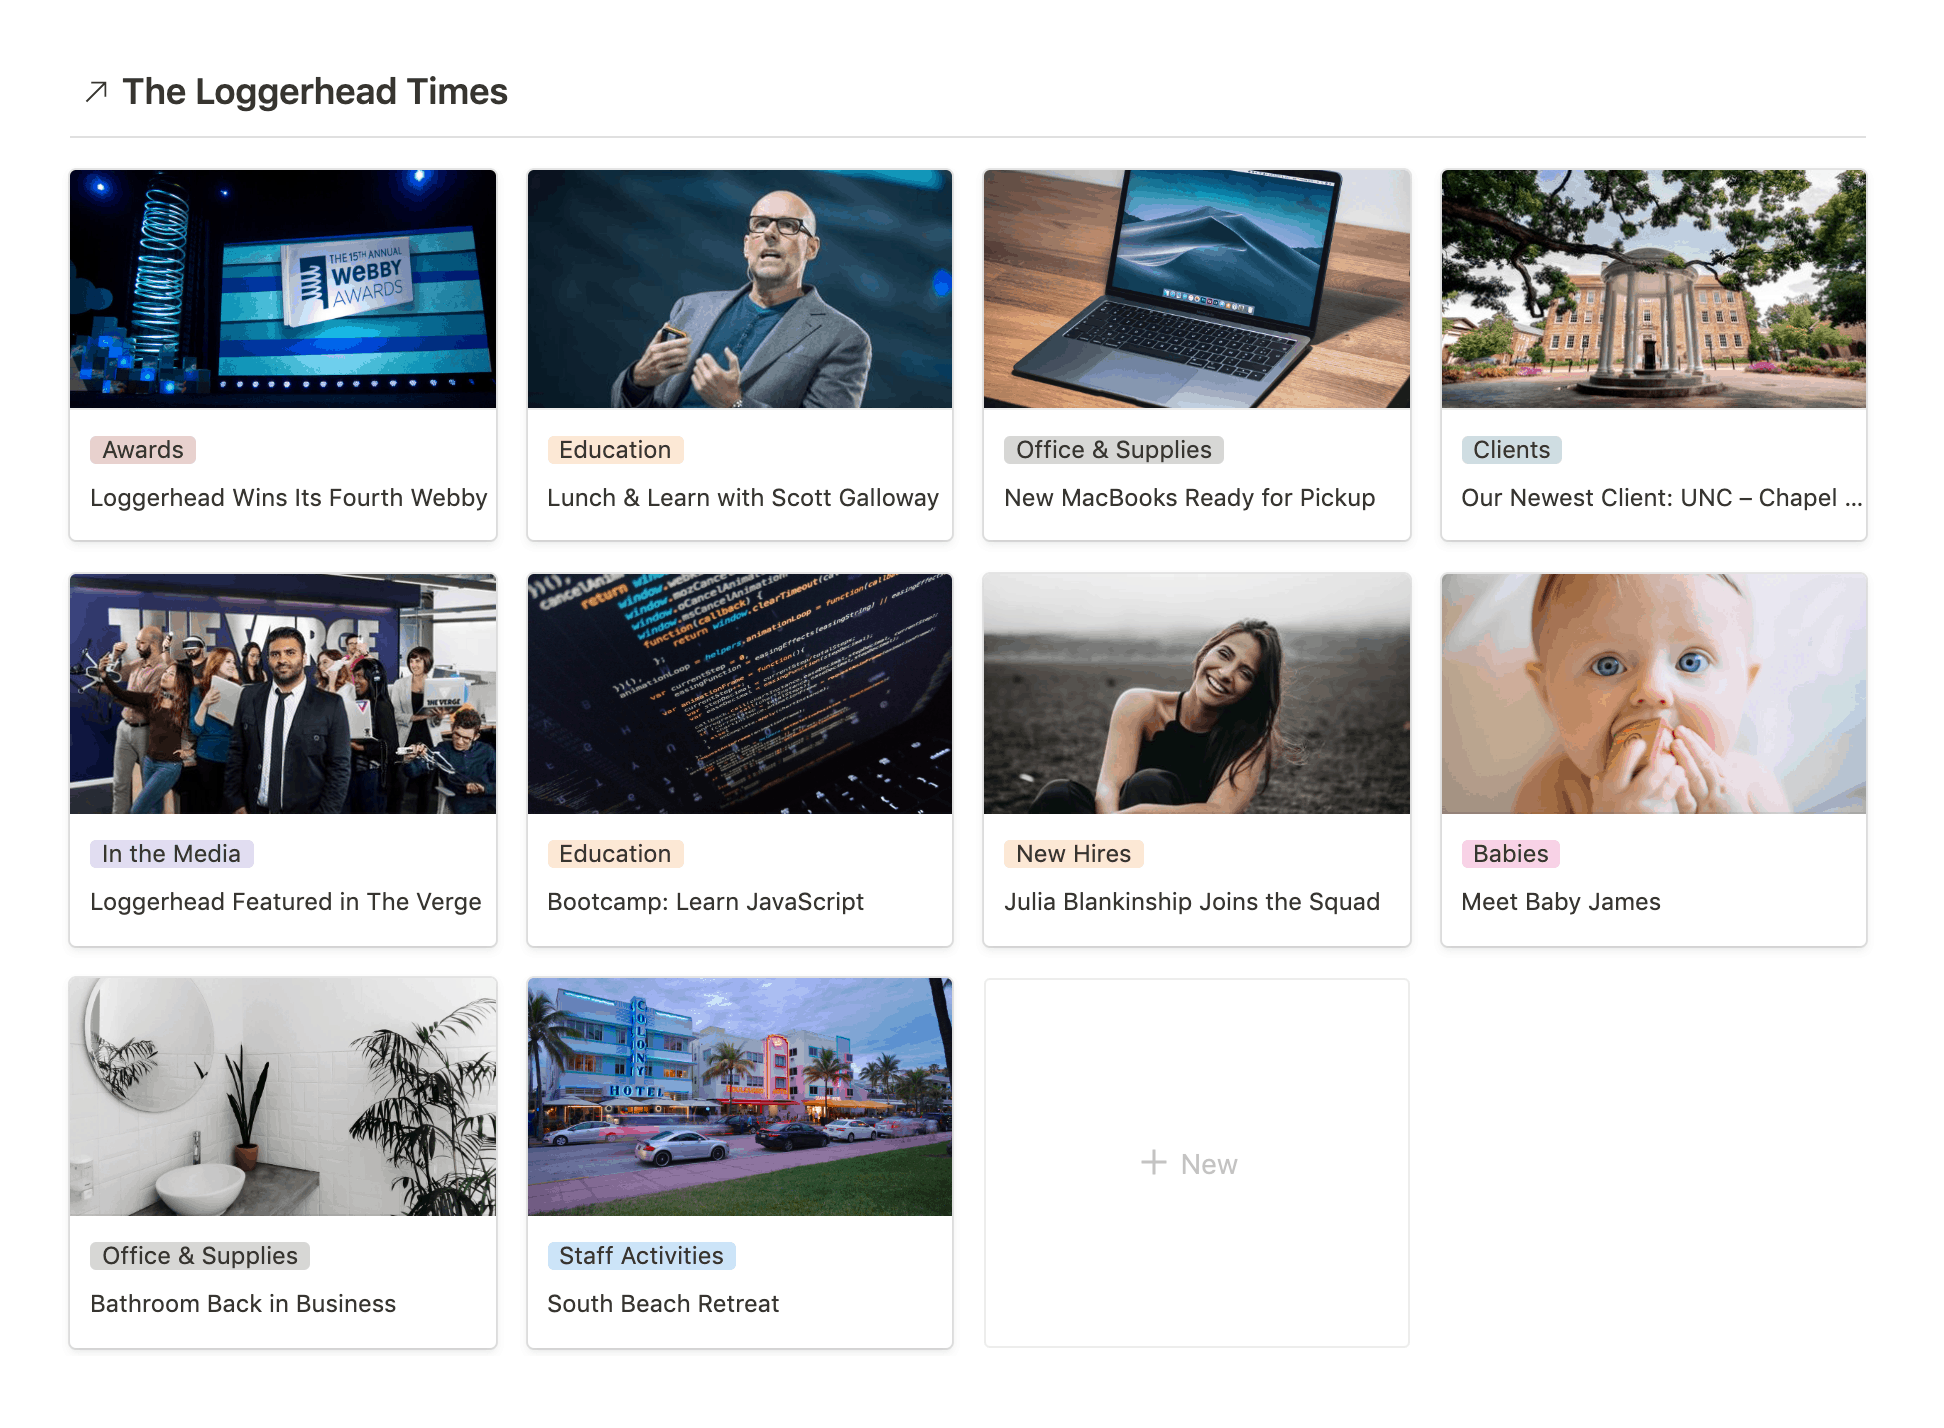
The Home Base for Loggerhead Labs also includes a Linked Database below its link columns. It’s a view of a database containing staff news, formatted as a Gallery. In addition to providing helpful information, this enhances the aesthetic if the Home Base.
And with that, you have the foundation of a bulletproof workspace and a deep understanding of Notion fundamentals. We’d love to see what you build (sans anything sensitive).
